Sunday, November 24, 2013

How to Lock Whatsapp with Password in Android Iphone and Blackberry

Posted by Ramesh Krishna 
Here is one more tip for people who would like to have some privacy on the messages in whatsapp. As the WhatsApp is not having inbuilt security feature we are using the Phone’s inbuilt pin and other pattern locking apps to protect messages from the unknown people, But we can’t block our friends and family members from accessing the whats app messages  with the phone’s inbuilt authentications as they knew our phone’s pin and other pattern locks!.
lock+whatsapp
Therefore we need a system like double authentication which ask for another pin or password  to access the messages in our whats app messenger!
We have tested so many apps which can block the unauthorized access to the WhatsApp Messages, finally we came up with a best app which is easy to use and simple in user interference.

Whatsapp Lock for Android:

whatsapp
  • This is a simple App which  can solve our problem and give complete privacy for the messages on Whatsapp 
  • The best feature of this app is it can take the photo of those who tried to access your Whatsapp messages with invalid pin! 
  • Simple and easy user Interference. 
  •  It is available for absolutely free on Google PlayStore. You can this app From Here. 
  •  Supports Android 2.2 and above
Download Whatsapp Lock Here

How To Lock Whatsapp on Iphone:

Till now there is not any genuine app that can lock only Whatsapp in iphone and ipad.In store there are many fake apps available which tells that this app can protect Whatsapp with password.That all are waste and doesn't work.I recommend you to not to buy that apps and if you want to protect your Whatsapp then you must go for home screen lock for now.If we found any genuine app we will update here.
Must Check: Whatsapp For PC free Download

Lock Whatsapp in Blackberry:

Yes here is simple app to lock Whatsapp messenger on your blackberry.Lock for Whatsapp allows you to keep your own password  for Whatsapp.

History About Android Versions InfoGraphic

Posted by Vinay Goud 
Android achieved some remarkable stones in last few years.You Might be Thinking Android is Google product yes its true but from 2005. Actually Android was founded by Andy Rubin,Rich Minner,Chris white and nick sears in year 2003.At first Android was developed for digital cameras as third party apps then shifted to mobiles.Google purchased android in 2005 as said above.Then after 2 years i.e on November 5th 2007 Google officially announced the development on Android OS.
History-of-Androidv5b.png++975%C3%973574+


Android Version till Now:

  • Android 1.5                         CupCake
  • Android 1.6                         Donut
  • Android2.0/2.1                     Eclair
  • Android 2.2                         Froyo
  • Android 2.3                         Ginegrbread
  • Android 3.0/3.1/3.2              Honeycomb
  • Android 4.0 and Later           Icecream Sandwitch
  • Android 4.1                          Jeally bean
  • and Finally Android 4.4         Kitkat
Interesting information right? Yes I feel
If you Want some more amazing facts and History about Android then Check below Info graphic developed by startapp

History-of-Androidv5b
 So Hows it? DO share your experience in the below comments and dont forget to share this with your friends on Social media.

How To Download and Install Android 4.4 Kitkat Launcher on any Android mobile


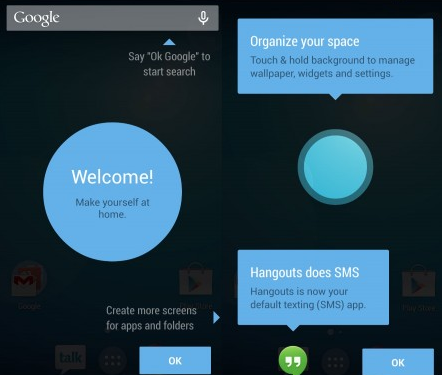
We have Discussed in the earlier article about all possible features in the Android 4.4 Kitkat version of Android. With the most attractive specifications in this version of android, It is finally released in the market and is available for you to launch it in your Smart phone. Do you have to buy a new phone for it? Not really!
android+kitkat++mobile+version
Do you have to to go through the rooting process or installing custom ROM Builds? Here is a big NO! Thanks to XDA Developers that have extracted the Android Kitkat launcher from Goolge Nexus 5 and converted it to a simple APK Installation file. This APK Installation is heck a very easy process and today in this article I am going to show you the step by step process.
And If you own Google Nexus 4 or Nexus 7 then there's a good news for you that you are soon going to have the official Android Kitkat 4.4 update for your Device.

google+nexus+7
For the others, Nothing to worry about. Here are a few steps you can follow to get the new Android Kitkat 4.4 version. 

Step By Step Process:

  • Firstly you need to download the Android Kitkat 4.4 Launcher Here.
  • Make sure your Device is with Android OS 4.1 Jelly bean or above.
  • Extract the download file using Winrar
  • Once you extract the download files.You can find the 3 apk files (Prebuilt Gms Core.apk, Velvet.apk, GoogleHome.apk) Now move all this apk apps to your phone memory
  • After moving to phone memory install these APK files on your mobile.
First install PrebuiltGmsCore.apk then Velvet.apk  and lastly GoogleHome.apk

  • Once you done with above step then you can select the Android Kitkat Launcher by pressing and holding the ‘Home’ button.

android+kitkat+launcher
That's it now you have successfully installed android kitkat launcher in your smart phone.If you find any difficultly in any of above steps or find any error comment below we will help you out

How to Create Wifi Hotspot in Windows 7 and Windows 8 -Best ways


If you are one who looking to convert your PC as Wifi Hotspot then you are done.Here in this article We listed best 2 ways to convert your laptop as Wifi router.Once you turn you PC as WiFi router you can connect devices such as Android, another laptops etc.

how-to-create-a-wifi-hotspot


Advantages of converting your laptop to a wifi router.

  • You can Enjoy internet in your wifi devices, any where you want but depend on your laptop wireless range.
  • Get rid of sitting at one place with wired internet connection.
  • If you have smart phone then you can get access to internet on your mobile.
There are numerous of method to turn your laptop a wifi spot (Windows 7 and 8 only),
Such as By command promote (only in windows 8) and by installing 3rd party software compatible with both.

First Method-

You need to follow below steps care fully in order to make your laptop wifi router successfully.
Step.1: Open run (windows key+R), type ncpa.npl.

windows8-run
Step.2: A new window is in front of you. There select wireless Network adapter and sharing center and select properties.
rightclick-wifi
Step.3: In wifi properties Select share, followed by Allow Others Network users to connect.
wifi-properties
Note- Never Tick 2nd Option.
Step.4: Now Open Command Promote As administrative.
cmd-command-promopt-windows8
Step.5: Don't worry by looking in below Command promote codes in picture, those are very simple.
             You need to copy and paste below command in command promote.
"netsh wlan set hostednetwork mode=allow ssid=”techbymak” key=”techbymak”"
window8-cmd
You will see SSid which is actually your network name, which we are going to create.
Step.6:Now you need to start the network By using below command.
"netsh wlan start hostednetwork"
Every thing is done. Now you can observe your laptop is working like a router.
Note:To check How many Devices Are connected to your router you need to enter below command in command promote.
"netsh wlan show hostednetwork"
This was the first method to make your laptop a router.

Second Method:

We are using a Software in this method to make laptop Wifi router, this method is compatible with both windows 7 and 8.The name of the software is Virtual Router.Download the software and install it.( once you downloaded it will come in zip format so extract it)

When you have done all these make sure are connected to the network you want to share and then launch VirtualRouterPlus.exe.
Remember - Run the .Exe as administrative.

Let's Create A Network.

  • In this method we are using Virtual router so it is essential to create a new network.
  • It is similar to 1st method, here SSid also means the name of the network which we are creating, you can enter what you want.
virtual_router_plus_5
  • If you want you can enter Password, it is important to prevent others to use your internet service. 
  • Now here you need to indicate which network is to be shared and then click on start Virtual Router.
I hope you guys like the article and feel useful for you .If you have any problem in above steps feel free to comment below we ill help you out.